Let’s unlock the secrets to radiant sculpting with our guide on how to contour for dark skin. Discover how to expertly enhance your features, celebrating your unique beauty through precise techniques tailored to your complexion. Join us on a journey that transforms shadows into elegance and elevates your makeup game to new heights!
In the world of makeup artistry, few techniques have captured the imagination as much as contouring. The transformative power of shading and highlighting has taken center stage, revolutionizing the way we enhance our facial features.
However, amidst the contouring craze, it’s crucial to acknowledge that not all techniques fit all skin tones.
Just as diverse as the array of skin colors are the nuances within each shade, and dark skin tones deserve specialized attention when it comes to contouring.
In this comprehensive guide, we will delve into the realm of contouring tailored specifically for dark skin.
Beyond the mainstream tutorials that often cater to lighter skin tones, we’ll explore the intricacies of contouring techniques that accentuate the beauty of rich and diverse complexions.
From debunking misconceptions to providing step-by-step instructions, we’re here to ensure that every individual, regardless of their skin tone, can confidently master the art of contouring.
So, if you’re ready to discover how to harness the power of contouring to enhance your dark skin, read on to unlock the secrets to a flawless, sculpted look that celebrates your natural beauty.
What to Know About Dark Skin and Contouring
Dark skin is a beautiful tapestry of rich and diverse hues that span a spectrum of undertones, from warm to cool.
Just as each individual’s skin is unique, so too should be their approach to makeup techniques like contouring.
Contouring on dark skin requires a deep appreciation for the distinct features and characteristics that make these complexions shine.
1. Celebrating Diversity
It’s important to recognize the vast array of dark skin tones and the variations that exist within them. From deep browns to rich mahogies, dark skin encompasses an array of shades that deserve specialized attention.
By acknowledging this diversity, we pave the way for contouring techniques that amplify the inherent beauty of each individual.
2. Dispelling Misconceptions
Misconceptions about contouring on dark skin often stem from a lack of representation and understanding.
Contrary to outdated beliefs, contouring is not about drastically altering one’s appearance; rather, it’s about subtly enhancing the natural bone structure and features.
Dark skin should never be considered a limitation for contouring, but rather a canvas that can be skillfully illuminated and sculpted.
3. Choosing the Right Products and Shades
A pivotal aspect of mastering contouring for dark skin is selecting the appropriate products and shades. Just as a painter chooses their palette, so too must makeup enthusiasts choose the hues that harmonize with their skin’s undertones.
Deeper contour shades, usually a few shades darker than the natural skin tone, are key to achieving a seamless, natural look. These shades create shadows that mimic the play of light on the face, resulting in dimension and depth.
4. Harmonizing with Undertones
Understanding undertones is paramount in achieving a flawless contour. Dark skin can have warm, cool, or neutral undertones.
Contouring shades should complement these undertones to create a harmonious and realistic effect.
A cool-toned contour on warm undertones, for instance, can appear ashy and unnatural. Therefore, identifying your undertone is a pivotal step in the contouring process.
Contouring is not a one-size-fits-all technique, and it’s certainly not confined to one skin tone. By appreciating the rich variety of dark skin tones and adapting techniques accordingly, we pave the way for a more inclusive and empowering approach to makeup.
The journey into the world of contouring for dark skin is one that celebrates individuality, diversity, and the power of self-expression.
Preparation and Tools: Setting the Stage for Flawless Contouring

Before embarking on the contouring journey, it’s essential to prepare the canvas properly. Achieving a flawless contour on dark skin involves not just the right technique but also the right preparation and tools.
Here’s a step-by-step guide to help you set the stage for a stunning contoured look.
1. Skincare Preparation: A Clean Canvas
- Start with a clean and moisturized face. Properly hydrated skin ensures smoother makeup application and blending.
- Use a gentle cleanser to cleanse your face, followed by a suitable moisturizer to lock in hydration.
- Don’t forget to apply a primer. Primers create a smooth base for makeup, helping it last longer and appear more even.
2. Foundation Application: Building the Base
- Choose a foundation that matches your skin tone perfectly. Even if you’re aiming for a contoured look, the foundation should match your natural skin color.
- Blend the foundation seamlessly using a makeup sponge or brush. Pay attention to blending along the jawline and hairline for a natural finish.
3. Contouring Tools: The Essentials
- Fluffy Contour Brush: Opt for a brush with soft, dense bristles. This brush is ideal for applying and blending contour products on larger areas like the cheeks and forehead.
- Small Contour Brush: A smaller brush with slightly firmer bristles is perfect for precise contouring, such as the nose and jawline.
- Beauty Blender or Makeup Sponge: Sponges are excellent for blending both cream and powder products, ensuring a seamless and natural appearance.
- Angled Brush: This brush is crucial for applying contour along the nose bridge and creating sharp lines.
4. Contouring Products: Finding the Right Shades
- Cream Contour: Cream products blend well into the skin and offer a natural finish. Choose a cream contour shade a few shades darker than your natural skin tone.
- Powder Contour: Powder products work best for oily skin types and can be layered over cream contour for extra intensity. Opt for a powder shade that matches your cream contour.
5. Translucent Powder: Sealing the Deal
- After contouring, set your makeup with a translucent setting powder to prevent creasing and ensure longevity.
- Use a fluffy brush to lightly apply the powder, focusing on areas prone to oiliness.
Step-by-Step Contouring Guide
Now that you’ve prepared your canvas and gathered the necessary tools, it’s time to dive into the step-by-step contouring process tailored specifically for dark skin tones.
Whether you’re a contouring novice or looking to refine your technique, these instructions will guide you toward achieving a stunning, sculpted look.
Step 1: Base Makeup and Foundation
The foundation of any makeup look, including contouring, is a well-prepared canvas. In this step, we’ll cover the process of creating a flawless base through proper skin care and foundation application, setting the stage for expert contouring on dark skin.
1. Cleanse and Moisturize: A Fresh Start
- Begin by cleansing your face with a gentle cleanser to remove any dirt, oil, or residue.
- Follow up with a suitable moisturizer to hydrate and nourish your skin. Well-hydrated skin ensures smoother makeup application and blending.
2. Prime for Perfection
- Apply a thin layer of primer to create a smooth base for your makeup. Primers help to fill in fine lines, blur imperfections, and ensure that your makeup lasts longer.
3. Choose the Right Foundation Shade
- Select a foundation shade that matches your natural skin tone. This is the key to achieving a seamless and natural-looking base.
- Test the foundation on your jawline to ensure a proper color match.
4. Apply and Blend Foundation
- Use a makeup sponge, brush, or your fingers to apply the foundation to your face.
- Start from the center of your face and blend outward, ensuring even coverage.
- Pay extra attention to areas that might need more coverage, such as blemishes or uneven skin tones.
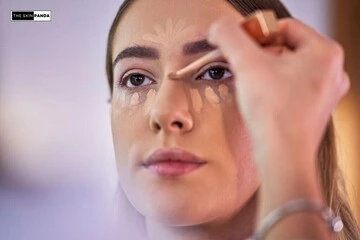
5. Conceal Where Needed
- If you have areas that require additional coverage, such as dark circles or blemishes, apply a creamy concealer that matches your foundation.
- Gently blend the concealer using a clean makeup sponge or brush.
6. Set the Foundation
- To prevent your makeup from shifting or creasing, set your foundation with a light dusting of translucent setting powder.
- Focus on areas prone to oiliness, like the T-zone (forehead, nose, and chin).
Step 2: Selecting the Right Contour Shade
Choosing the perfect contour shade is a pivotal step in achieving a natural and well-balanced contoured look on dark skin.
In this step, we’ll explore the intricacies of selecting the ideal shade that complements your skin tone and undertones, enhancing the sculpted effect with precision.
1. Understanding Your Skin Tone:
- Recognize that dark skin comes in a range of stunning shades, from deep browns to rich mahogany.
- Identify your own unique skin tone and undertones. Undertones can be warm, cool, or neutral.
2. Contour Shade Depth:
- Opt for a contour shade that is a few shades darker than your natural skin tone. This shade differential creates the illusion of shadows and enhances dimension.
3. Complementing Undertones:
- Choose a contour shade that complements your skin’s undertones:
- Warm Undertones: Consider a contour shade with warm undertones, such as a deep brown with warm bronze undertones.
- Cool Undertones: Opt for a contour shade with cool undertones, like a deep taupe or ash brown.
- Neutral Undertones: A contour shade that leans neither too warm nor too cool can work well for neutral undertones.
4. Swatch and Test:
- To ensure the chosen contour shade works harmoniously with your skin, swatch it on your jawline or the side of your face.
- Observe how the shade blends and interacts with your natural skin color.
5. Naturalness is Key:
- The goal is to create shadows that mimic natural contours. Avoid shades that are too dark or stark, as they can result in an unnatural appearance.
6. Experiment and Adjust:
- Don’t be afraid to experiment with different shades and undertones to find what works best for your skin.
- Remember that makeup is an art, and finding the perfect contour shade may require a bit of trial and error.
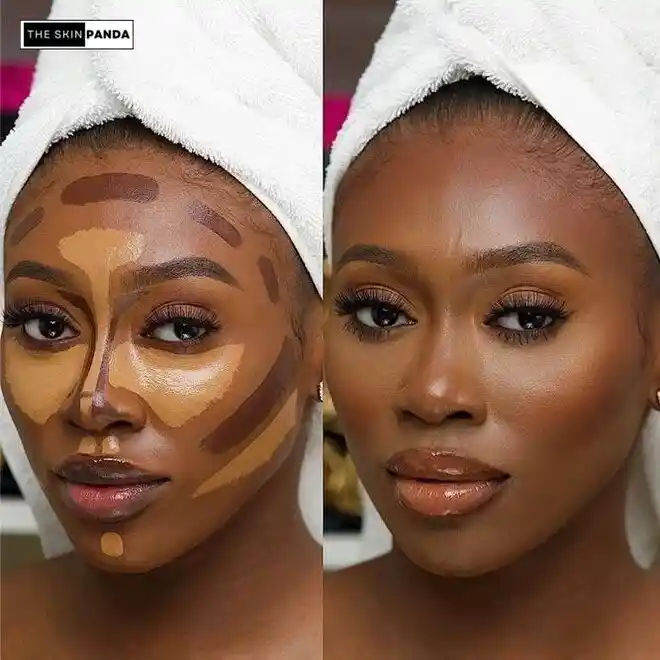
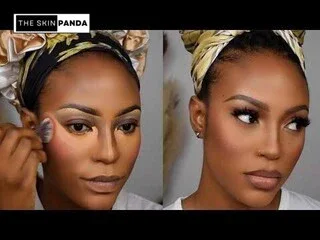
Step 3: Mapping the Face
1. Cheekbones: Suck in your cheeks to identify the hollows. Using a fluffy contour brush, apply the contour shade along the hollows, starting from your ears and stopping before the apples of your cheeks.
2. Jawline: Define your jawline by applying contour along the underside of your jaw using the same brush.
4. Forehead: For a smaller forehead appearance, apply contour along the hairline and blend well.
5. Nose: Using a small contour brush, apply contour along the sides of your nose to create the illusion of a slimmer bridge.
Step 4: Application Techniques
1. Cheekbones: Blend the contour on your cheekbones upwards and towards your temples in gentle circular motions. Ensure there are no harsh lines.
2. Jawline: Blend the contour along your jawline using back-and-forth motions, seamlessly merging it with your neck.
3. Forehead: Blend the contour along your hairline, focusing on softening any edges.
4. Nose: Blend the contour along the sides of your nose with light strokes to create a subtle shadow.
Step 5: Blending for Natural Results
Blending is the secret ingredient that transforms contour lines into a natural, radiant masterpiece. In this step, we’ll explore the art of blending, an essential skill that ensures your contoured look on dark skin appears effortlessly seamless and utterly natural.
1. The Importance of Blending:
- Blending is the key to achieving a flawless and cohesive contoured appearance.
- Proper blending erases harsh lines and creates a harmonious transition between the contour and your natural skin.
2. The Right Tools:
- Utilize a clean makeup sponge or brush for blending purposes.
- A damp makeup sponge is excellent for seamlessly merging cream products, while a brush works well for both cream and powder formulas.
3. Circular Motions for Cheeks and Jawline:
- For the cheekbones and jawline, use gentle circular motions to blend the contour product.
- Start from the contour area and move outward to diffuse the color and soften the edges.
4. Upward and Outward Strokes:
- When blending the forehead and nose contour, use upward and outward strokes.
- This technique ensures a natural transition between the contour and the rest of your makeup.
5. Feathered Blending for a Soft Finish:
- Feathered blending involves using a light touch and short strokes to create a feather-like effect.
- Apply less pressure as you blend towards the edges of the contour, creating a gradual fade.
6. Beware of Overblending:
- While blending is crucial, be cautious not to overblend and diffuse the contour too much.
- Maintain a balance where the contour is distinct enough to create shadows yet seamlessly integrated with your base makeup.
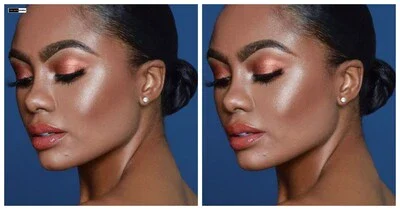
Step 6: Highlighting – Illuminating Your Features with Elegance
Highlighting is the radiant counterpart to contouring, adding a touch of luminosity to your contoured canvas. In this step, we’ll explore the art of highlighting, guiding you to elegantly enhance specific areas of your face on dark skin for a truly captivating effect.
1. The Purpose of Highlighting:
- Highlighting brings light and radiance to the high points of your face.
- It complements contouring by accentuating the areas that naturally catch light.
2. Selecting the Right Highlighter Shade:
- Opt for a highlighter shade that complements your skin tone.
- Warm gold rose gold, and bronze tones tend to work well on dark skin, providing a beautiful glow.
3. Highlighting Areas:
Apply highlighter to the high points of your face that catch light:
- Tops of cheekbones
- Bridge of the nose
- Cupid’s bow (the center of your upper lip)
- Brow bones
- The inner corners of the eyes
4. Application Techniques:
- Use a fan brush, a small highlighting brush, or your fingertips for precise application.
- Lightly sweep or tap the highlighter onto the designated areas.
5. Blend Softly:
- Blend the highlighter slightly using a clean brush or your fingertip.
- The goal is to achieve a soft, radiant glow rather than a harsh, glittery finish.
6. Building Intensity:
- If you prefer a more intense glow, you can layer the highlighter.
- Apply additional layers gradually to achieve the desired luminosity without overwhelming the look.
Step 7: Set with Translucent Powder
After crafting a beautifully sculpted and illuminated appearance, it’s time to ensure that your artistry stays put throughout the day.
In this step, we’ll explore the importance of setting your makeup with translucent powder, allowing your contoured look to shine with longevity and grace on dark skin.
1. The Role of Translucent Powder:
- Translucent powder is a lightweight, colorless powder used to set your makeup.
- It helps prevent creasing, smudging, and excess shine, ensuring your contoured look remains intact.
2. Choosing the Right Translucent Powder:
- Opt for a finely milled, translucent powder that won’t alter the color of your contour or highlight.
3. Setting Key Areas:
- Focus on setting the areas where you’ve applied concealer, foundation, and contour.
- Gently press the powder onto your skin using a soft, fluffy brush.
4. Blotting Away Excess Shine:
- If you have oily skin, translucent powder can help control excess shine throughout the day.
- Apply a bit more powder to the T-zone (forehead, nose, and chin) to combat oiliness.
5. Applying with Precision:
- Use a light hand when applying translucent powder to avoid over-powdering.
- Tap off excess powder from your brush before application to prevent a heavy, cakey finish.
6. Enhancing Longevity:
- The translucent powder creates a barrier that helps lock your makeup in place.
- This is particularly important for preserving the intricate work of your contoured and highlighted areas.
Contour For Dark Skin Tips and Tricks
Embarking on the journey of contouring for dark skin is an exciting adventure in enhancing your natural beauty.
To make your experience even more rewarding, here are some invaluable tips and tricks that will help you master the art of contouring with finesse on dark skin.
1. Less is More:
- Start with a light application of contour and build up gradually to achieve your desired intensity.
- The goal is to create subtle shadows that enhance your features without overpowering them.
2. Natural Lighting Matters:
- Contouring under natural lighting offers the most accurate reflection of how your makeup will appear throughout the day.
- If possible, apply and assess your contour in well-lit natural light.
3. Embrace Cream and Powder Harmony:
- Layering cream contour with powder contour can provide an intensified yet seamless finish.
- Use a light hand when layering to maintain a natural appearance.
4. Experiment with Undertones:
- Don’t be afraid to mix and match contour products to achieve the perfect undertone for your skin.
- Blending different undertones can create a more nuanced and natural shadow effect.
5. Blending is Key:
- Take the time to blend thoroughly after each step of contour application.
- Proper blending ensures that your contour seamlessly melds with your natural skin tone.
6. Multi-Use Products:
- Some contour shades can double as eyeshadows or brow fillers.
- Expanding the use of your products can save time and reduce clutter in your makeup collection.
7. Highlight Placement Matters:
- Applying highlighter to the right areas can create the illusion of higher cheekbones and a lifted appearance.
- Be strategic in your highlighting to complement your contour.
8. Capture Your Progress:
- Take photos during your contouring process to assess your work from various angles.
- This helps you identify areas that might need adjustment for an even look.
9. Practice, Practice, Practice:
- Contouring is a skill that improves over time with practice.
- Don’t be discouraged by initial attempts; embrace the learning process.
10. Celebrate Your Unique Features:
- Your facial features are like art waiting to be accentuated.
- Tailor your contouring to celebrate your individuality and unique beauty.
Common Mistakes to Avoid in Contouring for Dark Skin
While the journey of contouring for dark skin is undeniably exciting, there are some common pitfalls that can hinder your desired results.
By being aware of these mistakes and taking proactive steps to avoid them, you can ensure that your contouring efforts yield a flawless and stunning outcome.
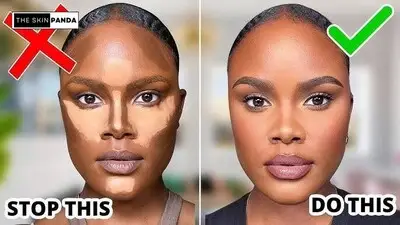
1. Choosing the Wrong Contour Shade:
Mistake: Opting for a contour shade that is too dark or too cool can result in an unnatural appearance.
Solution: Select a contour shade that is a few shades darker than your natural skin tone and complements your undertones.
2. Skipping Skincare Preparation:
Mistake: Neglecting proper cleansing, moisturizing, and priming can lead to uneven product application and blending.
Solution: Begin with a clean, moisturized face and use a primer to create a smooth canvas for contouring.
3. Over-Application of Product:
Mistake: Applying too much contour product in one go can make it difficult to blend and create a heavy, caked-on look.
Solution: Begin with a light application and build up the contour gradually as needed.
4. Harsh Lines and Blending Issues:
Mistake: Failing to blend contour lines properly can result in visible and unnatural lines on the face.
Solution: Use clean brushes or sponges to blend contour lines thoroughly, focusing on creating seamless transitions.
5. Neglecting Highlighting:
Mistake: Skipping the highlighting step can lead to a lack of balance between contour and luminosity.
Solution: Ensure you highlight key areas like the cheekbones, nose bridge, and brow bones to enhance the dimension of your face.
6. Disregarding Your Face Shape:
Mistake: Applying a one-size-fits-all contouring approach without considering your unique face shape can yield unflattering results.
Solution: Tailor your contouring techniques to complement your specific face shape and features.
7. Ignoring Natural Lighting:
Mistake: Applying contour and makeup under artificial lighting can result in an appearance that looks different in natural light.
Solution: Whenever possible, contour and assess your makeup in natural lighting to achieve accurate results.
8. Overuse of Shimmer and Glitter:
Mistake: Over-applying shimmery highlighter can lead to an overly shiny finish that doesn’t complement the contour.
Solution: Use shimmery highlighters sparingly and strategically for a radiant, balanced effect.
9. Failing to Adapt to Skin Changes:
Mistake: Not adjusting your contouring routine for changes in skin tone, texture, or undertones can lead to mismatched results.
Solution: Regularly reassess your products and techniques to accommodate any changes in your skin.
10. Lack of Practice:
Mistake: Expecting perfection without practice can lead to frustration and unsatisfactory results.
Solution: Embrace the learning process and dedicate time to practice different techniques.
PEOPLE ALSO ASK (FAQs)
Question 1. How to do Contour Makeup for Dark Skin?
Answer: Mastering contour makeup for dark skin involves selecting a shade that’s a few tones darker than your skin, enhancing your natural shadows. Apply the contour along your cheekbones, jawline, forehead, and nose using gentle blending motions. Finish by highlighting high points for a sculpted, radiant look that celebrates your unique beauty.
Question 2. Where do you Contour on Dark Skin?
Answer: On dark skin, contour along the cheekbones, jawline, forehead, and nose to enhance natural shadows. The strategic application creates dimension and depth for an elegant sculpted effect.
Question 3. How do I Choose Contour for Brown Skin?
Answer: To choose a contour for brown skin, opt for shades a few tones darker than your natural skin tone, enhancing your features. Consider your undertones – warm, cool, or neutral – and select a contour shade that complements them beautifully. Swatch and test shades to find the perfect match, creating a natural, sculpted look.
Question 4. Do you Contour with a Darker Shade?
Answer: Yes, contouring involves using a darker shade to enhance shadows and create dimension on your face. Applying the darker shade strategically along areas like cheekbones and jawline creates a sculpted and balanced appearance.
Question 5. Which Contour Shade is Best for Dark Skin?
Answer: For dark skin, the best contour shade is a few tones darker than your natural skin tone, enhancing shadows without appearing too harsh. Choose a shade that complements your undertones – warm, cool, or neutral for a natural and beautifully sculpted look.
Question 6. How do I Find the Right Contour Color?
Answer: To find the right contour color, choose a shade a few tones darker than your skin and match your undertones warm, cool, or neutral. Test shades on your jawline to ensure a seamless blend, creating a natural and well-defined contoured look.
Question 7. How Many Shades Darker for Contour?
Answer: Contouring effectively involves choosing a shade that is typically around two to three shades darker than your natural skin tone. This subtle contrast enhances shadows and depth, creating a beautifully sculpted appearance that complements your features.
Question 8. Do Dark Skin People Need Bronzer?
Answer: While bronzer isn’t always necessary for dark skin tones, it can add warmth and a sun-kissed glow to the complexion. Opt for bronzer shades that are slightly deeper than your natural skin tone to achieve a natural and radiant look that enhances your unique beauty.
Question 9. Should the Contour be Lighter or Darker than the Foundation?
Answer: The contour should be slightly darker than your foundation to create natural-looking shadows and depth on your face. The contrast between the two shades enhances your features without appearing too stark. Balancing the tones ensures a harmonious and well-blended contouring effect, adding dimension to your overall makeup look.
Conclusion
Contouring on dark skin is a captivating journey that celebrates the rich tapestry of diverse beauty. As we conclude this comprehensive guide, it’s evident that contouring is not just an art form; it’s an empowering expression of individuality.
By understanding the nuances of dark skin tones, selecting the right shades, mastering application techniques, and embracing the art of blending, you’ve unlocked the keys to sculpting a flawless canvas that enhances your natural features.
Through each step, you’ve learned to appreciate the delicate balance between shadows and highlights, crafting an exquisite harmony that adds depth, dimension, and radiance to your appearance.
As you master these techniques and tailor them to your unique face shape and undertones, you’ll embark on a creative journey that is uniquely your own.
Remember, every contouring stroke is an opportunity to celebrate your heritage, express your creativity, and amplify your natural beauty.
Whether you’re stepping into the limelight or embracing a more subdued look, the skills you’ve gained will serve as a testament to your mastery of the art of contouring on dark skin.
Disclaimer
Please note that the information provided in this guide is for general educational purposes only and should not replace personalized advice from a professional makeup artist. Results may vary based on individual skin types, preferences, and techniques. Always perform patch tests and consider consulting a beauty expert for tailored recommendations.